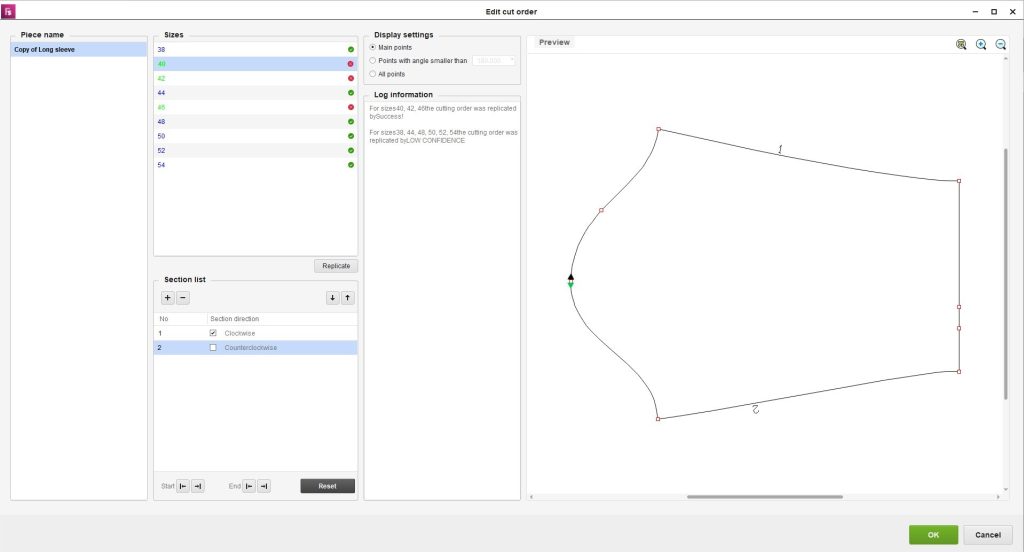
1.Piece name
Here is displayed the list of names belonging to the pieces from the model, for which can be edited the contour’s cutting order.
Note! If you access the function when pieces are selected, the list only displays the selected pieces. If you access the function with no piece selected, the list displays all the pieces from the model that are eligible for editing the cutting order.
The preview area displays the piece selected in the list.
2.Sizes
Here is displayed the list of sizes existing in the model.
In the preview area is displayed the piece on the size selected in this list.
After editing the cutting order, the sizes are displayed according to the following color code:
A size highlighted in blue or red will be highlighted in green after carrying out modifications to the cutting order and quitting editing the size by selecting another size.
The sizes highlighted in black will be highlighted in green only after declaring a cutting section on them.
3.Section list
Here are displayed the added sections, according to their cutting order and cutting manner.
For each of the added sections, the following information is displayed:
- No;
- Section direction – it can be clockwise or anticlockwise on the piece contour; the default direction is clockwise;
- Start – the start point’s name;
- Stop – the stop point’s name.
The list is, initially, empty; to add sections to it, click on Add.
The first section added to the list is declared to have, as a start point, the origin point, and will be drawn clockwise on the contour, up to the stop point, which, in this case, is, again, the origin point.
In the preview area, the selected section is marked with green, and the start point is marked with a green arrow; the section’s cutting order number is displayed on it.
The added section’s start points and stop points can be repositioned by using the following buttons:
- Move start point clockwise – repositioning the start point clockwise toward the stop point;
- Move start point anticlockwise – repositioning the start point anticlockwise toward the stop point;
- Move stop point clockwise – repositioning the stop point clockwise toward the start point;
- Move stop point anticlockwise – repositioning the stop point anticlockwise toward the start point.
The added sections can be moved one position higher or lower on the list by selecting the section, and accessing the Move up / Move down button.
To delete the added sections, you can click on the Delete button, to delete the selected section, or on the Reset button, which resets all the added sections.
In the preview area there are three section states, that are marked with:
- green – marks a section that is added to the list and is selected;
- bold black – marks the sections from the list and that are unselected;
- simple black – marks the contour of the piece where a section was not added.
The position of a selected section’s start point can be also modified by clicking on one of the main points of the piece from the preview area, and its setting as a start point.
The sections’ cutting order defined on one of the sizes can be replicated on all the sizes of the piece from the model by clicking on Replicate.
4.Display settings
It is in this area that you can set the type of points to be displayed on the pieces in the preview area:
- main points;
- main points with an angle smaller than a set value;
- all points – will be displayed the main points and the curve points.
5.Log information
In this area is displayed the information regarding the status of the cutting order replication on the model’s sizes. Depending on the manner in which the replication is carried out, it can either be completed successfully or failed.
6.Preview
In the Preview area is displayed the contour of the piece selected in Piece name, on the size selected in Sizes.
To close and save the modifications made in this window, click on OK.
To close the window without saving the modifications, click on Cancel.
WARNING!
Checking the pieces must be done before editing the cutting order.
The cutting order is declared after completing the model, given that the subsequent modifications made to the geometry of the model’s pieces leads to resetting the cutting order set on them.
Note! Do not change the base size after editing the cutting order.
Note! In the case of the pieces with declared symmetry axis and/or folds, the cutting order is declared on the symmetrized and/or unfolded piece.
After the contour’s cutting order has been declared, a new size added in the model won’t take over the cutting order declared for the other sizes.
The cutting order declared for a piece will be applied on all its pairs.
The cutting order declared in Fashion STUDIO is maintained on the pieces, when the model is imported in Nest EXPERT.