ویدئو شماره 28

Check pieces as designed

With this function, you will check the piece on the sewing line, on all the sizes. You will make this action in order to see if there are some construction errors on the piece.

The check is aimed at detecting:

  • grain axis(-es) on the piece(s);
  • types of materials associated with the piece(s);
  • overlapped points;
  • contour self-intersections;
  • overlapped notches, notches with identical parameters or notches intersecting the contour;
  • whether the length of the points’ tangent is 0;
  • whether it is possible to apply the grading pack on the piece;
  • the consistency of the information from the piece’s structure;
  • the size set validity.

To check one or more pieces, first, select them, and, then, click on the Check pieces as designed button. If no piece is selected and the function is accessed, all the pieces in the model will be checked.

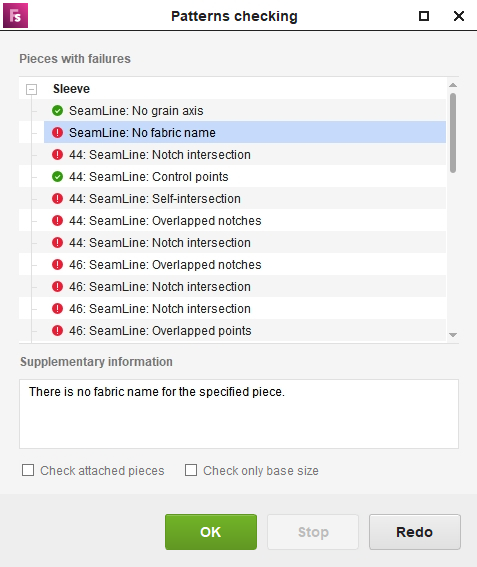
When accessing the Check pieces as designed function, the Patterns checking window opens; here, the defective piece list is displayed.

By default, the checking is carried out on all the sizes from the model, but you can also opt for only checking the base size, in which case, you need to click on the Check only base sizebutton. 

As the checking is being carried out, on the lower side of the Patterns checking window, a progress bar is displayed, indicating how much has been checked of the entire model or of all the selected pieces.
The list contains the pieces where have been encountered errors – the errors identified on each size from the model. Some of the errors are corrected automatically, being marked with a green symbol, others require the user’s intervention, who corrects them manually; these errors are marked with a red symbol.
To assist you with identifying and correcting the errors, as soon as one of the errors on the list is selected, the application automatically covers the following stages:

  • it brings to the fore the piece with the selected error;
  • it selects and marks the elements creating the error, to be able to subsequently identify them;
  • it changes the current working mode with the one in which the error can be corrected;
  • it changes the model’s base size with the one the selected error was found on.

Warning! When selecting an error, the model’s base size is changed with the one the error was found on. When the error has been corrected, consider setting the initial base size.
The moment each error is selected, information on the origin of the problem is displayed in the Supplementary information area.

The check is run on the main pieces. To also carry out the checking of the attached pieces, select the Check attached pieces option.
Once the errors have been corrected, to re-check the model, click on the Redo button. To close the Patterns checking window, click on OK. The checking process can be stopped by clicking on the Stop button.

In the assistance window, this button 

can be used to show/hide all error messages.

When the checking window closes, the last state of the Extend all or Collapse all button is memorized, being maintained up to closing the application.

Note! There is a verification that is carried out automatically when models are opened. The verification is for the validity of the manually graded elements. If no error occurs during the verification, the Assistance window does not open. If errors occur, the window opens and this error message is displayed: SeamLine: Invalid element grading. In most of the cases, the error is corrected automatically, and supplementary information is displayed: There was a problem with the specified element’s grading and it was reset. Please check element’s grading. If the automatic correction cannot be carried out, this message is displayed: There was a problem with the specified element’s grading and it could not be corrected. Please contact the support department.

The piece checking is also carried out when saving the model; thus, if fatal errors occur, they are identified.  

If the model contains such errors, a window opens, displaying this message: Invalid elements were detected in the model. If you choose to execute this action, the model may become corrupted. Please contact the support department! The window also contains the Continue and Undo buttons.

The backup and autobackup files are saved depending on the status of the check: if this type of error has been encountered, when creating these files, the Corruptedprefix is added to the name. The last backup and autobackup files, which are uncorrupted, are kept.

It is recommended that the pieces on which various operations were carried out should be regularly checked during the designing stage.

You Tube

مشاهده ویدئو در یوتیوب

telegram

مشاهده ویدئو در تلگرام

instagram

مشاهده ویدئو در اینستاگرام

شروع به کار

بسته برنزی

آموزش تصویری نرم افزار جمینی نسخه فشن استادیو
تومان
335000
3 ماهه
  • شامل 79 ویدئو از فصل اول تا سوم
  • پشتیبانی از طریق چت آنلاین
  • بدون کتاب
پیشرفت

بسته نقره‌ای

آموزش تصویری نرم افزار جمینی نسخه فشن استادیو
تومان
695000
6 ماهه
  • شامل 153 ویدئو فصل اول تا ششم
  • پشتیبانی از طریق چت آنلاین
  • بدون کتاب
حرفه‌ای

بسته طلایی

آموزش تصویری نرم افزار جمینی نسخه فشن استادیو
تومان
1235000
12ماهه
  • شامل 212 ویدئو کتاب
  • پشتیبانی از طریق چت آنلاین
  • بدون کتاب
خرید کتاب

کتاب

کتاب نرم‌افزار الگوسازی جمینی نسخه فشن استادیو
تومان
850000
  • قطع رحلی 302 صفحه رنگی با کیفیت عالی
  • پشتیبانی از طریق چت آنلاین
  • بدون بسته آموزش تصویری
فیلدهای نمایش داده شده را انتخاب کنید. دیگران مخفی خواهند شد. برای تنظیم مجدد سفارش ، بکشید و رها کنید.
  • عکس
  • شناسه محصول
  • امتیاز
  • قیمت
  • در انبار
  • موجودی
  • افزودن به سبد خرید
  • توضیحات
  • محتوا
  • عرض
  • اندازه
  • تنظیمات بیشتر
  • ویژگی ها
  • ویژگی های سفارشی
  • زمینه های دلخواه
برای پنهان کردن نوار مقایسه ، بیرون را کلیک کنید
مقایسه
لیست علاقه مندی ها 0
توجه: شما مجاز به کپی محتوا یا مشاهده سورس نیستید!!