ویدئو شماره 146

Define matching manually

If you will assign on the pieces the fabrics with warp and weft stripes from Gemini Cloud , and declared it as Checks or with Weft Stripes Across the Fabric/Warp Stripes Along the Fabric, the matching rules and lines can be created automatically. More details about the process you will find in Assigning the fabric with warp and weft stripes from Gemini Cloud and creating automatically the matching rules 

If you will not assign the fabric with declared pattern type form Gemini Cloud you will have to manually create the matching lines and matching rules in the function Define matching manually.

Definition of terms

The matching system requires two types of information for obtaining a perfect cut for an article made of fabrics with repetitive prints on it:

  • the definition of key positions on the pieces that will match each other (we will call these elements matching lines);
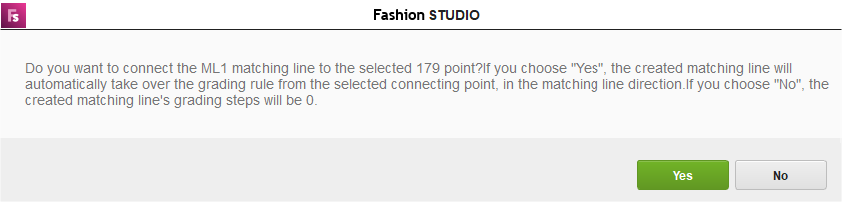
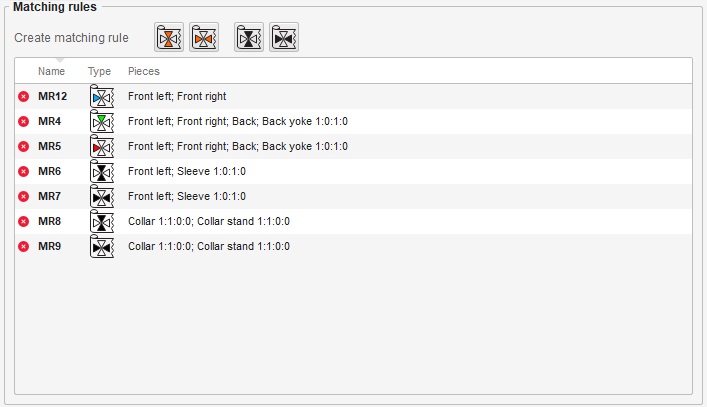
  • the rules that explain the way in which the defined key positions will have to match each other (we will call these entities matching rules).

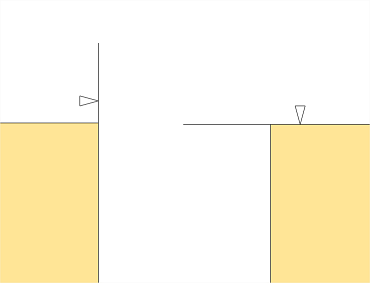
Matching lines: as described above, a matching line is an element used to mark a key matching position in the article.
The matching line element is defined by:

  • Name: it has a default name that can include letters and/or numbers.
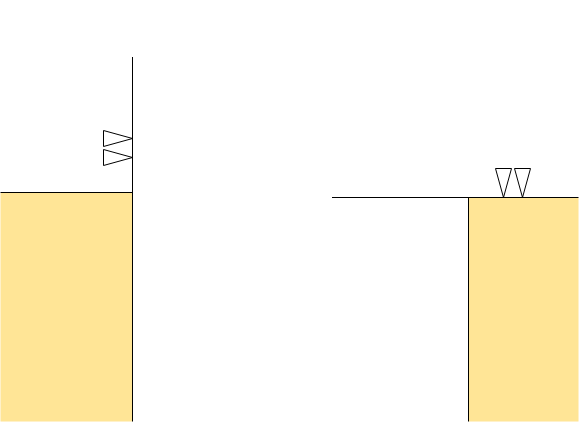
  • Direction type: can be on weft or warp direction of the fabric
    • The weft matching line is parallel to the weft stripes of the fabric and will be perpendicular to the grain axis
    • The warp matching line is parallel to the warp stripes of the fabric. and will be parallel to the grain axis
    • Note! The line orientation is automatically updated if the grain axis’s angle is changed. If the piece doesn’t have a grain axis, it cannot have matching lines either.

There are two types of matching lines:

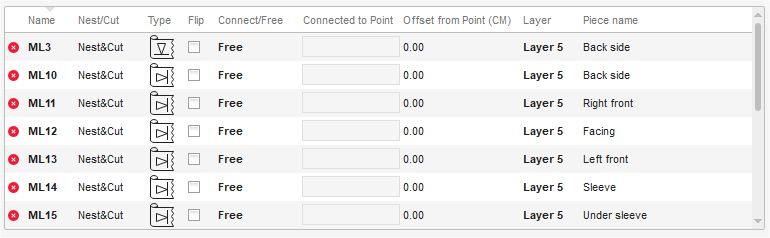
  • Nest&Cut – used in the Nest EXPERT application. 

Is the line that defines the piece’s position in the marker, and is considered a piece positioning reference to the grid, in the nesting module. There can only be one Nest&Cut matching line on a piece at any time and, by default, it will be the first defined line on the piece.

If you are working only with the Nest EXPERT application is necessary to have defined on the piece only the Nest&Cut line, if you added also Cut matching lines, these will be ignored in the nesting application when matching the pieces to the fabric.

  • Cut – used by the Vision CUT application.

It is used for alignment with other auxiliary lines or primary lines, considering the fabric’s real distortion. The result will be visible after cutting the matched pieces on the automatic cutting machine.

Matching rules: formulas that contain matching lines belonging to different pieces. The matching rule defines the relation between different pieces in the marker, relative to the fabric report.
There are two types of matching rules:

  • Piece to piece:  use this rule when you want simply want to see that the stripe lines are continuous from one piece to another and you are not interested to see that those continuous stripes pass through a specific location of your product. (the continuity of stripes is indicated by the position of the matching lines, and you will have to make sure that all the matching lines in the same direction to be aligned on the pieces).
  • Piece to fabric: use this rule when you want to see that a specific stripe line passes through an exact location from your product (the location is marked by the position of the matching line).

The matching definition on the pieces has to steps:

  1. Define the position of the matching lines
  2. Define matching rules between the pieces

1. Defining the position of the matching lines

  1. Go to the section Create matching line, and select one of the matching line options :


The lines that you can create are: 

  • Warp line along the fabric
  • Weft line across the fabric

When selecting one of these lines will be displayed the Function steps where you will be asked to indicate the position of the line on the piece. 

The line can be placed any ware, inside the piece area. If the line will be positioned on an element (grading point, internal point) will happen the following :

  • the line will be positioned with its center at an X, Y offset from the element, and by default, the offset is 0 and displayed in the Matching lines table in the column Offset from point
  • will be displayed the message, which asks you if you want to connect the line to the point

If you agree to connect the line to the point and the point is graded on X and y, will be taken the grading step value which is parallel with the matching line direction, and any change that you will apply to the point (moving the point position or changing the grading step) is applied also to the matching line.

The grading table of the matching line has the following parameters:

Parameter Functionality
Grading type By table When is set the grading by table, for a line that is already connected to a point, the connection will be lost, and displayed the message below: And you will be able to edit its grading step.
Grading type Connected to point In the edit is displayed the name of the point at which is connected the line. For this type of grading, you cannot edit the grading step of the line. You may change the point name from this edit in order to connect the line at some other point.
Size Displays the size set of the model
Offset Displays the distance of the line from the connected point
Dl Is the sum of the step value from the base size to the other sizes.
Step Is displayed the step value of the point at which is connected the line.

After setting the position and grading of the matching line, it will be displayed in the Matching line table which contains the next parameters:

 
Parameter Functionality
Name Displays the name of the matching line.
Nest/Cut Displays the type of the matching line: Nest & Cut or Cut
Type Displays to which matching rule belongs the line. The color inside the triangle will show to which matching rule is belonging the line: tringle is not filled with color, the matching line does not belong to a matching rule triangle is filled in black color, the matching line belongs to piece to fabric rule triangle is filed with some other colors, the matching lines belongs to the piece to piece matching rule, if there are more line that has the same color for the triangle, those lines will belong to the same matching rule
Flip Use this parameter when you want to see the symmetry of the fabric pattern (stripes/checks) on the pieces that you cannot declare as left and right - for example, a model with two front pieces, where one front is bigger/ smaller than the other. When you want to make the symmetry, just check this option.
Connect/ Free Displays if the matching line is connected or not to a point. When is not connected will be displayed Free status.
Connected to point An edit where is displayed the name of the point at which is connected the line. The edit is disabled when the line is not connected to a point.
Offset from point Displays the distance of the line from the connected point. The offset can be edited only if you have the line connected to a point.
Layer Displays the cutting layer of the matching line.
Piece name Displays on which piece is created the matching line

The created lines can be displayed for a couple of pieces or on all the pieces from the model in function of what is selected in the section View matching lines for:

  • selected pieces
  • all pieces in the model

2. Define matching rules between the pieces

After positioning the matching lines you will have to create the matching rules between the pieces which can be created in the  Matching rules table.

The matching rules which can be created are:

 
Piece to piece on warp along the fabric
Piece to piece on weft along the fabric
Use the rule when the pieces must match each other so that drawing from the fabric continues from one piece to the other, regardless where the fabric drawing is positioned inside the piece.
 
Piece to fabric on warp along the fabric
Piece to fabric on weft along the fabric

When selecting a matching rule will be displayed the function step which is aking you to select two pieces where were already defined the matching lines.

After selecting the pieces the matching rule will be created and added in the matching rule table:

The table contains the next parameters and symbols:

 
Parameter Functionality
Delete button for the matching rule.
Name The name of the matching rule
Type What type of matching rule is: black triangles piece to fabric matching rule colored triangles is piece to piece matching rule
Pieces Are displayed the name of the pieces which are belonging to the matching rule. If there are declared two piece to piece matching rules in different directions, you will be able to easily identify in each matching rule is a specific piece, because the matching lines will have the same triangle color as the one from the matching rule.

The matching rules will be marked also in the origin of the grain axis with a graphical symbol with triangles that are filled with the same colors as the matching lines.

You Tube

مشاهده ویدئو در یوتیوب

telegram

مشاهده ویدئو در تلگرام

instagram

مشاهده ویدئو در اینستاگرام

شروع به کار

بسته برنزی

آموزش تصویری نرم افزار جمینی نسخه فشن استادیو
تومان
335000
3 ماهه
  • شامل 79 ویدئو از فصل اول تا سوم
  • پشتیبانی از طریق چت آنلاین
  • بدون کتاب
پیشرفت

بسته نقره‌ای

آموزش تصویری نرم افزار جمینی نسخه فشن استادیو
تومان
695000
6 ماهه
  • شامل 153 ویدئو فصل اول تا ششم
  • پشتیبانی از طریق چت آنلاین
  • بدون کتاب
حرفه‌ای

بسته طلایی

آموزش تصویری نرم افزار جمینی نسخه فشن استادیو
تومان
1235000
12ماهه
  • شامل 212 ویدئو کتاب
  • پشتیبانی از طریق چت آنلاین
  • بدون کتاب
خرید کتاب

کتاب

کتاب نرم‌افزار الگوسازی جمینی نسخه فشن استادیو
تومان
850000
  • قطع رحلی 302 صفحه رنگی با کیفیت عالی
  • پشتیبانی از طریق چت آنلاین
  • بدون بسته آموزش تصویری
فیلدهای نمایش داده شده را انتخاب کنید. دیگران مخفی خواهند شد. برای تنظیم مجدد سفارش ، بکشید و رها کنید.
  • عکس
  • شناسه محصول
  • امتیاز
  • قیمت
  • در انبار
  • موجودی
  • افزودن به سبد خرید
  • توضیحات
  • محتوا
  • عرض
  • اندازه
  • تنظیمات بیشتر
  • ویژگی ها
  • ویژگی های سفارشی
  • زمینه های دلخواه
برای پنهان کردن نوار مقایسه ، بیرون را کلیک کنید
مقایسه
لیست علاقه مندی ها 0
توجه: شما مجاز به کپی محتوا یا مشاهده سورس نیستید!!