ویدئو شماره 143

Define dart

The creation of a dart is carried out in three stages:

  1. Drawing the dart;
  2. Defining the dart;
  3. Checking and modifying the dart.

The drawing of the dart involves modifying the piece contour so that the dart cut-out be created.
Two elements must be focused on at the level of this stage: the position of the dart’s peak point (which will determine the dart’s depth) and the distance between the dart’s two end points (which will determine the dart’s width).

In the Garment working mode, click on Define dart:

  • In Step 1, select the dart’s peak point.
  • In Step 2, select the first dart edge.
  • In Step 3, select the second dart edge.
 

When all of the three dart points have been indicated, the application highlights the dart peak, that is marked with a circle.
Furthermore, the dart’s cut line is also highlighted, being the piece’s splitting line, if the dart is closed or shrunk.
The dart thus defined can be deleted – select it and press the Delete key.

Dart editing

In the case of a defined dart, there are more operation types that can be carried out, with an eye on:

  • checking the dart so that, at the moment of the sewing, the two sides overlap perfectly, and the contour resulted be smooth;
  • editing the dart by rotating it and creating new darts – derived ones, turning it to a folded dart, cutting the piece following the dart line or closing the dart.
 

When the dart has been selected, its properties are displayed in Context options.

The dart’s dimensions are displayed in the AngleDepthLength fields, these values not being editable.
The actions that can be carried out to edit a dart are: RotateTransform to folded dartTrim with dart cut line and Close.
In the notches table, you can edit the properties of the darts’ notches (shape, length, width, direction). The darts’ notches can be deleted by unchecking Add notch on First point and/or Add notch on Second point.

Dart rotating

To rotate a dart, click on Rotate, from Context options/Edit dart.


Rotating the dart manually or automatically results in its complete or partial transfer on the piece contour.

The dart can be rotated in two modes:

  • Manually – select one of the dart edge points, drag and drop it in a clockwise or counterclockwise direction, so that the current dart is freely resized:
  • Automatically – by editing the values of one of the parameters (depth, angle, or percent) for the New Dart 1, in the table displayed in the function step pannel.

In the Depth column, edit  the depth of the new dart that will result after applying the current dart rotation.

In the Angle column, edit the angle of the new dart that will result after applying the current rotation

In the Percent column, edit the percentage value from the current dart for opening the New dart. 

Before entering the new value for the desired parameter, at Rotation type, opt for a direction to rotate the dart edge: Clockwise or Counterclockwise.

This function enables a dart’s opening to be distributed into a number of smaller darts.


Distributing the values for the newly-obtained darts is carried out by entering values in the Function steps table. Enter the values for one dart only and in one of the columns; for the second dart/for the rest of the columns, the values are computed automatically.

The values entered or recalculated in the Depth field represent the real depths of the darts resulting when applying the rotation.
The dart’s rotation can be distributed evenly, by clicking on Distribute.
In Rotation type you can opt for a rotation direction (clockwise or anticlockwise).
To validate the Rotate dart function, click on Validate.

Once the function has been applied, the piece splits along the dart’s cut line, and a new dart is created, which takes over the original dart’s angle difference.
Each dart created can be selected individually, in order to carry out modifications to it.
You can rotate a dart from the working space, as well, by selecting one of the dart’s sides and rotating it into a certain position with the cursor.
If the cut line of one of the darts perfectly overlaps the opposite dart’s sides, it rotates, transferring its depth onto the opposite dart.

The dart can be opened in any location from the piece contour by repositioning its slashing line (cut line). 

The dart slash line is displayed on the piece as a dotted line that starts from the dart peak and ends on the piece contour. The dart slash line can be edited ONLY in the Shape mode by: 

  • repositioning its end point (select, drag and drop it anywhere on the piece contour):
  • its reshaping (select the line, transform it into a curve and reshape it). This action is required when you want to create a dart with curved edges.
 

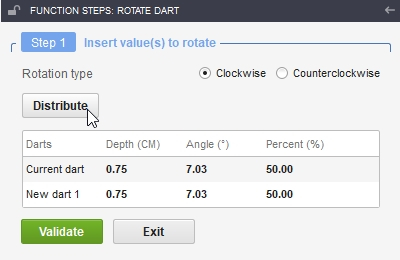
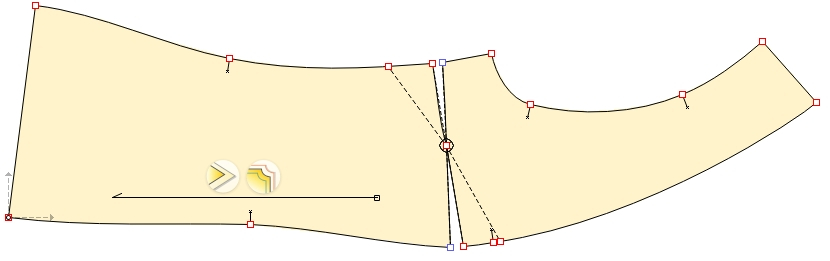
Rotate the dart when you need to:

  • move one dart to a new place on a sewing pattern;
  • separate one large dart into several smaller darts;
  • distribute the fabric suppression in a dart into tucks, pleats or gathers;
  • add style lines to patterns, and partially or completely eliminate darts.

Transform to folded dart


Opt for Transform to folded dart if you wish to fold the original dart. You can also select a folding direction (clockwise or anticlockwise) for the folded dart.
If you wish to re-open the dart from Edit dart, use Transform to dart.

Notches can be edited in the same way as in the case of the open dart.
The folded dart peak’s position can only be modified through the X and Y coordinates relative to the piece origin or to the current position.


Trim with dart cut line

The shape of a dart’s cut line can be modified, to accurately set the place on the contour where the piece will be split, and to modify the dart’s shape.
The dart’s cut line position can be modified from the Shape working mode, by moving the point where it intersects the piece contour.

Note!This point is selected by applying the parent-child selection principle (click on the piece, then, on the dart’s cut line, and, eventually, on the intersection point).

To cut a dart, access Trim with dart cut line, from Context options/Edit dart.


Close

To completely close the original dart, click on the Close button.
What results is the complete closing of the original dart, by rotating the area between one of the dart’s sides and its cut line, up to the point the dart’s two sides join one another. Following the rotation of this area, a new dart opens on the dart’s cut line. You can choose the rotation direction: clockwise or anticlockwise.

If the cut line of one of the darts perfectly overlaps the extension of the opposite dart’s sides, it closes, transferring its depth onto the opposite dart.

 
You Tube

مشاهده ویدئو در یوتیوب

telegram

مشاهده ویدئو در تلگرام

instagram

مشاهده ویدئو در اینستاگرام

شروع به کار

بسته برنزی

آموزش تصویری نرم افزار جمینی نسخه فشن استادیو
تومان
335000
3 ماهه
  • شامل 79 ویدئو از فصل اول تا سوم
  • پشتیبانی از طریق چت آنلاین
  • بدون کتاب
پیشرفت

بسته نقره‌ای

آموزش تصویری نرم افزار جمینی نسخه فشن استادیو
تومان
695000
6 ماهه
  • شامل 153 ویدئو فصل اول تا ششم
  • پشتیبانی از طریق چت آنلاین
  • بدون کتاب
حرفه‌ای

بسته طلایی

آموزش تصویری نرم افزار جمینی نسخه فشن استادیو
تومان
1235000
12ماهه
  • شامل 212 ویدئو کتاب
  • پشتیبانی از طریق چت آنلاین
  • بدون کتاب
خرید کتاب

کتاب

کتاب نرم‌افزار الگوسازی جمینی نسخه فشن استادیو
تومان
850000
  • قطع رحلی 302 صفحه رنگی با کیفیت عالی
  • پشتیبانی از طریق چت آنلاین
  • بدون بسته آموزش تصویری
فیلدهای نمایش داده شده را انتخاب کنید. دیگران مخفی خواهند شد. برای تنظیم مجدد سفارش ، بکشید و رها کنید.
  • عکس
  • شناسه محصول
  • امتیاز
  • قیمت
  • در انبار
  • موجودی
  • افزودن به سبد خرید
  • توضیحات
  • محتوا
  • عرض
  • اندازه
  • تنظیمات بیشتر
  • ویژگی ها
  • ویژگی های سفارشی
  • زمینه های دلخواه
برای پنهان کردن نوار مقایسه ، بیرون را کلیک کنید
مقایسه
لیست علاقه مندی ها 0
توجه: شما مجاز به کپی محتوا یا مشاهده سورس نیستید!!