ویدئو شماره 123

Edit seam allowance

The Edit seam allowance function contains two zones where you can edit the parameters for the segment seam allowance and the specific geometric shapes of the corner types. These are displayed in the Activity Zone, in the Context options panel.

We recommend that the seam allowance be displayed before performing editing actions, so the changes could be checked in real time. The seam allowance can be displayed on the selected patterns by pressing the Show/Hide seam allowance button in the general toolbar or by clicking on the Gizmo button, directly on the piece.

For each seam allowance type and for each corner type there is, in the Context options area, a graphical sketch, specific to the selected corner/seam allowance, with a detailed technical drawing for the seam/corner type parameters. The graphical sketch helps to easily identify where a parameter is applied.

Seam allowance

To display the Seam allowance area, select at least one segment of a piece’s contour in the working area. You can simultaneously edit different segments selected from a piece or from different pieces.

The seam allowance can be ParallelVariable or Step.

  • Parallel Seam allowance

Parallel Seam allowance can be defined in three different ways, using up to three folds:

Fold 1 – is set by default, and creates a parallel to the selected seam line. The default corner type set for the end points of the selected seam line is Intersection,and it can be changed to any other corner type from the Corner type list.

Parameters:

Width – here can be edited the parallel seam allowance width, using positive or negative values.

Positive value – allows for all corner types from the Corner type list to be set on the ends of the selected segment.

Negative value – at the ends of the selected segment the Trim corner type is automatically set, and it is the only corner type available.
Validate the input value by pressing the Enter key.

Previous along seam (notch for the Fold 1) – the button on the left side of the Width input. It is, by default, unchecked. By checking this parameter, at the last point, in clockwise direction, of the selected seam line’s correspondent on the cut line, a corner notch is created, at the intersection of the seam line’s fictive continuation and the next cut line.

Next along seam (notch for the Fold 1) – the button on the right side of the Width input. By default, it is unchecked. By checking this parameter, at the first point, in clockwise direction, of the selected segment’s correspondent on the cut line, a corner notch is created at the intersection of the seam line’s fictive continuation and the previous cut line.
On the right side of the Folds parameters, a graphical sketch is displayed, specific to Parallel, Fold 1 seam allowance.

Fold 2 – can be selected by dragging the vertical slider, with the mouse, down to the Fold 2 option. The Fold 2 option extends the seam allowance with a parallel segment to the Fold 1 parallel. The default corner types, automatically set for the end points of the selected segment, are: Next symmetry, in the first point of the selected segment, in clockwise direction, and Previous symmetry, in the last point of the selected segment, in clockwise direction.

The available corner type list for these two end points contains: Previous symmetryNext symmetryIntersection and Trim.
Parameters:

Width – here you can edit the parallel seam allowance’s width for the Fold 2.
Note! This input’s value can only be smaller or equal to the Fold 1 Width.
Press the Enter key to validate the input value.

Previous along seam (notch for the Fold 2) – the button on the left side of the Fold 2 Width input. It is, by default, unchecked. By checking this parameter, at the last point, in clockwise direction, of the selected segment’s correspondent on the cut line, a corner notch is created at the intersection of the Fold 1 parallel and the next cut line.

Next along seam (notch for the Fold 2) – the button on the right side of the Fold 2 Width input. It is, by default, unchecked. By checking this parameter, at the first point, in clockwise direction, of the selected segment’s correspondent on the cut line, a corner notch is created at the intersection of the Fold 2 parallel and the previous cut line.

When editing the Fold 2 parallel seam allowance options, the Fold 1 parameters can be also edited.
On the right side of the Folds parameters, the graphical sketch is updated, specific for the Parallel, Fold 2.

Fold 3 – It is, by default, not selected, and it can be selected by dragging the vertical slider, with the mouse, down to the Fold 3 option. The Fold 3 option extends the seam allowance with a parallel segment to the Fold 2 parallel. The default corner types for the ends of the selected segment are the same as for the Fold 2 set.

Parameters:

Width – here you can edit the parallel seam allowance’s width for the Fold 2.
Note! This input’s value can only be smaller or equal to the Fold 2 Width value.
Press the Enter key to validate the input value.

Previous along seam (notch for the Fold 3) – the button on the left side of the Fold 3 Width input. It is, by default, unchecked. By checking this parameter, at the last point, in clockwise direction, of the selected segment’s correspondent on the cut line, a corner notch is created at the intersection of the Fold 2 parallel and the next cut line.

Previous along seam (notch for the Fold 3) – the button on the left side of the Fold 3 Width input. It is, by default, unchecked. By checking this parameter, at the last point, in clockwise direction, of the selected segment’s correspondent on the cut line, a corner notch is created at the intersection of the Fold 2 parallel and the next cut line.
When editing the Fold 3 parallel seam allowance options, the Fold 1 and the Fold 2 parameters can be also edited.
On the right side of the Folds parameters, the graphical sketch is updated, specific to the ParallelFold 3.

  •  Variable Seam allowance

Variable Seam allowance has the same options and functionality as the Parallel Seam allowance, the difference being that, instead of the Width column, you can edit two columns: Initial and Final.

Initial – the input value from this field is applied to the first grading point of the selected segment, in clockwise direction.

Final – the input value from this field is applied to the last grading point of the selected segment, in clockwise direction.
The graphical sketch of the seam allowance is updated in real time for each fold.

  • Step Seam allowance

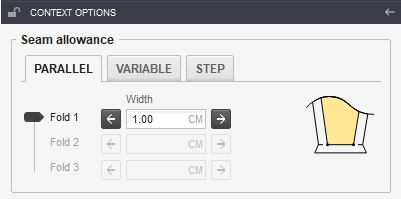
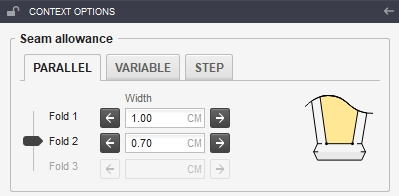
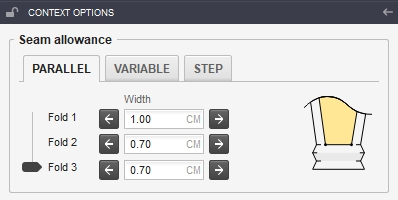
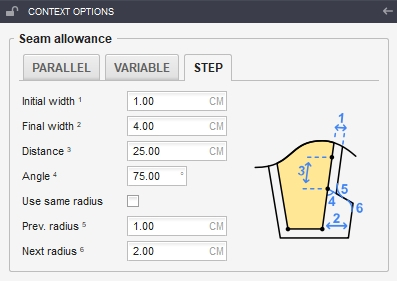
Step Seam allowance parameters:

Initial width ¹ – this value is applied as Parallel seam allowance, from the first point of the selected segment and a length entered in the Distance³ field.

Final width ² – this value is applied as Parallel Seam allowance, starting at the end of the Initial width¹, up to the last main point of the selected segment, in clockwise direction.

Distance ³ – the length of the section applied as Initial width seam allowance.

Angle  – the angle under which the segment that connects the Initial width ¹ to the Final width ² is built.

Use same radius – refers to the radius of the circle arc that is used to round the corners resulted on the intersection of the Initial width and the Final width. If this option is checked, the value used for the Prev. radius⁵ input or the Next radius ⁶ input is automatically used for both of them. If this option is unchecked, different values can be used for each of the inputs.

Prev. radius ⁵– the radius of the circle arc that is used to round the previous corner.

Next Radius ⁶ – the radius of the circle arc that is used to round the next corner.

Corner type

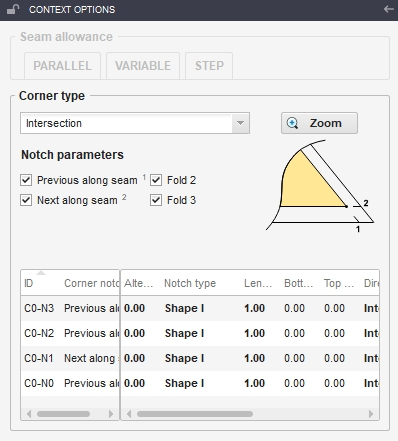
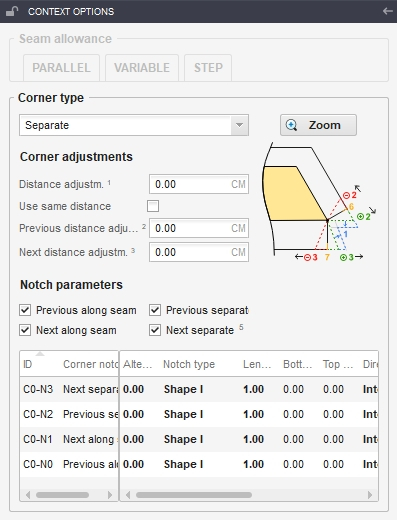
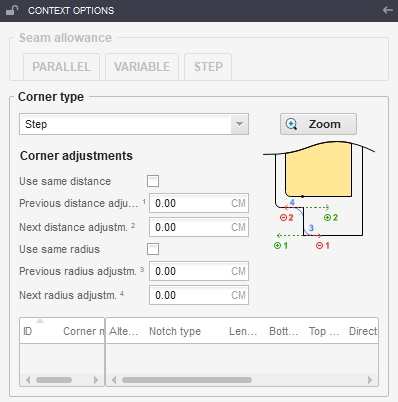
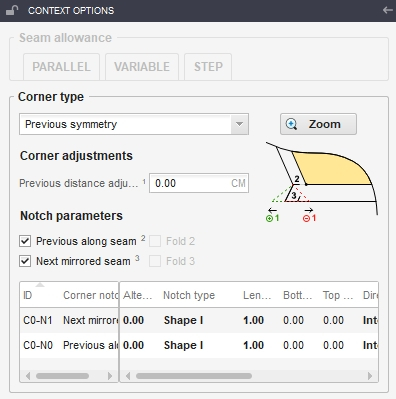
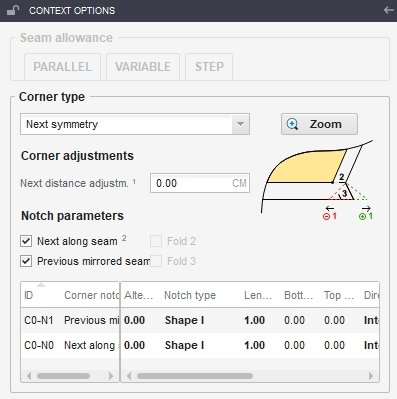
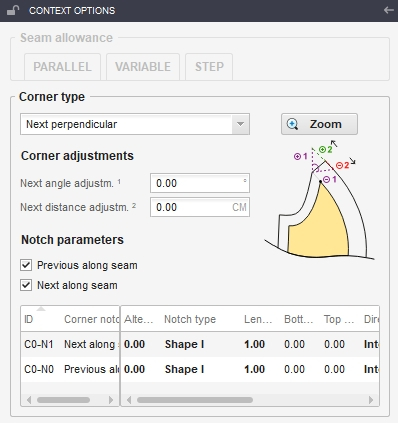
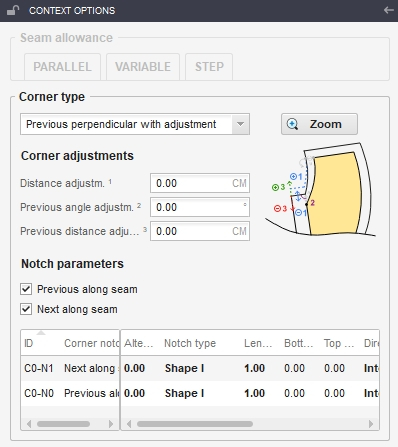
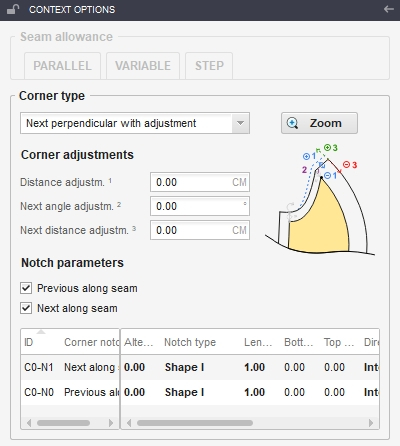
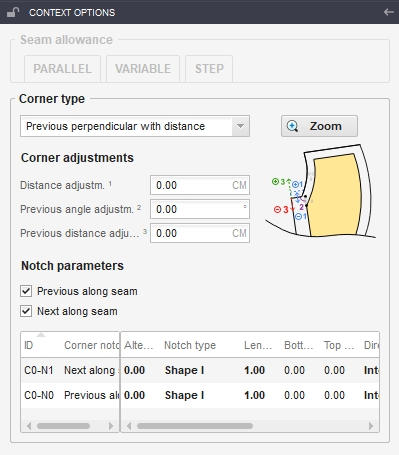
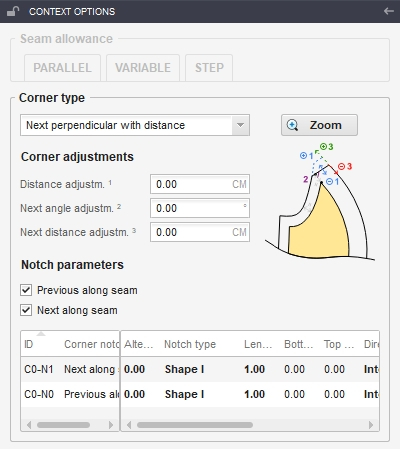
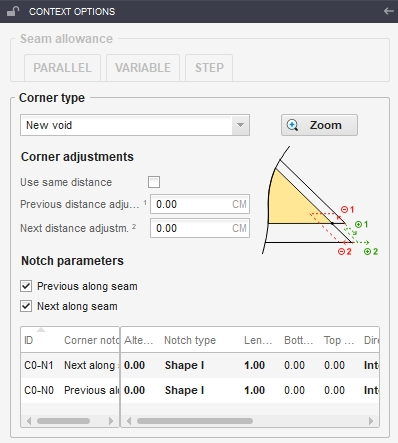
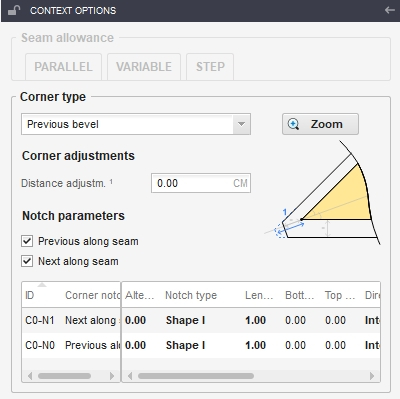
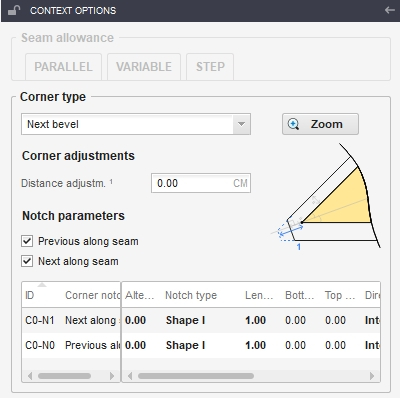
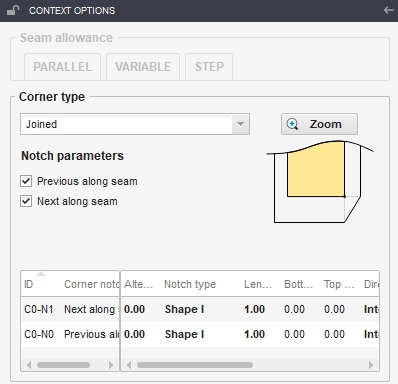
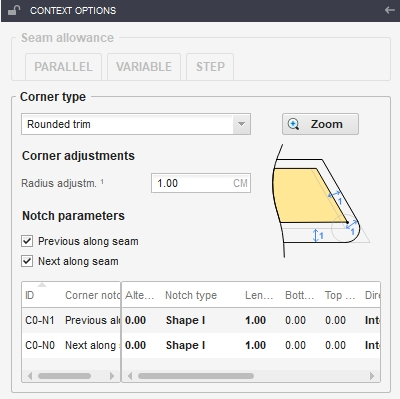
Select at least one corner/main point to expand the Context options side panel and to display the Corner type area.
Each corner type has a specific graphical sketch, displayed on the right side of its properties, that can be opened by clicking on the Zoom button, in a separate window with the name of the selected corner. By resizing this window, the graphical element can be zoomed in or out. The graphical sketch window stays open while changing the corner type and updating the sketch to the newly-selected corner, in real time. When clicking on a button corresponding to a function or to a working mode, the graphical sketch window closes.
For the seam allowance that has the previous or/and the next corner type, with at least the Fold 2 option set, in the Corner type list there are only four types of corners displayed: Previous symmetryNext symmetryIntersection and Trim.
For each corner type can be created one or more corner notches, by checking the notch parameters. Each corner notch created is added to the corner notch table, where you can manage the notch properties. (See the notch parameters from the table).

The parameters of each type of corner:

  •  Intersection corner

Notch parameters:

Prev. along seam¹ – by checking this parameter, a corner notch is created on the next cut line, at the intersection between the previous seam line’s fictive continuation and the next cut line.

Next along seam² – by checking this parameter, a corner notch is created on the previous cut line, at the intersection between the next seam line’s fictive continuation and the previous cut line.

Fold 2 – by checking this parameter, a corner notch is created on the cut line, in the Fold 2 position. The parameter is enabled only if the seam allowance of the selected corner has the Fold 2 option set.

Fold 3 – by checking this parameter, a corner notch is created on the cut line, in the Fold 3 position. The parameter is enabled only if the seam allowance of the selected corner has the Fold 3 option set.

  •  Separate corner

Corner adjustments:

Distance adjustment¹ – by changing the default value, parallels are created to the lines that join the corner with the previous and next cut lines, the result being a new shape/contour of this corner.

Use same distance – if this option is checked, the value typed in the Prev. distance adjustment² field or in the Next distance adjustment³ field is automatically set to both of them. If this option is unchecked, different values can be used for each of the inputs.

Prev. distance adjustment²– by changing the default value, the previous seam allowance is cut (negative value entered) or increased (positive value entered) accordingly, along its direction.

Next distance adjustment³ – by changing the default value, the next seam allowance is cut (negative value entered) or increased (positive value entered) accordingly, along its direction.

Notch parameters:

Prev. along seam – by checking this parameter, a corner notch is created on the next cut line, at the intersection of the previous seam line and the next cut line.

Next along seam – by checking this parameter, a corner notch is created on the previous cut line, at the intersection of the next seam line and the previous cut line.

Prev. separate – by checking this parameter, a corner notch is created on the previous cut line, on the default shape of this corner type (Distance adjustment¹ default value = 0).

Next separate – by checking this parameter, a corner notch is created on the next cut line, on the default shape of this corner type (Distance adjustment¹ default value = 0).

  • Step corner

Corner adjustments:

Use same distance typed in the Prev. distance adjustment¹ field or in the Next distance adjustment² field is automatically used for both of them. If this option is unchecked, different values can be used for each of the inputs.

Prev. distance adjustment1– by changing the default value, the previous seam allowance is cut (negative value entered) or increased (positive value entered) accordingly, along its direction.

Next distance adjustment² – by changing the default value, the next seam allowance is cut (negative value entered) or increased (positive value entered) accordingly, along its direction.

Use same radius – if this option is checked, the value used for the Prev. radius adjustment³ field or Next radius adjustment⁴ field is automatically used for both of them. If this option is unchecked, different values can be used in each of the inputs.

Prev. radius adjustment³– the radius of the circle arc that is used to round the previous corner.

Next radius adjustment – the radius of the circle arc that is used to round the next corner.

  •  Previous symmetry corner

Corner adjustments:

Prev. distance adjustment¹ – by changing the default value, the previous seam allowance is cut (negative value entered) or increased (positive value entered) accordingly, along its direction.

Notch parameters

Prev. along seam² – by checking this parameter, a corner notch is created on the cut line, at the intersection of the next seam line and the previous cut line.

Next mirrored seam³ – by checking this parameter, a corner notch is created on the cut line, at the intersection of the mirrored next seam line and the previous cut line.

Fold 2⁴ and Fold 3⁵ – parameters that are enabled only if the previous or/and next seam allowance of the selected corner have the Fold 2 and Fold 3 options set.

  • Next symmetry corner
 

Corner adjustments:

Next distance adjustment¹ by changing the default value, the next seam allowance is cut (negative value entered) or increased (positive value entered) accordingly, along its direction.
Notch parameters

Next along seam² – by checking this parameter, a corner notch is created on the cut line, at the intersection between the next seam line and the previous cut line.

Prev. mirrored seam³ – by checking this parameter, a corner notch is created on the cut line, at the intersection between the mirrored previous seam line and the next cut line.

Fold 2⁴ and Fold 3⁵ – parameters that are enabled only if the previous and/or next seam allowance(s) of the selected corner have a seam allowance with the Fold 2 and Fold 3 options set.

  • Previous perpendicular corner

Corner adjustments:

Prev. angle adjustment¹ – by changing the default value, the perpendicular’s foot is rotated, relative to its default position. The seam allowance is cut (negative value entered) or increased (positive value entered) accordingly.

Prev. distance adjustment² – by changing the default value, the previous seam allowance is cut (negative value entered) or increased (positive value entered) accordingly, along its direction.

Notch parameters:

Prev. along seam – by checking this parameter, a corner notch is created on the next cut line, at the intersection of the previous seam line and the next cut line.

Next along seam – by checking this parameter, a corner notch is created on the previous cut line, at the intersection of the next seam line and the previous cut line.

  • Next perpendicular corner

Corner adjustments:

Next angle adjustment¹ – by changing the default value, the perpendicular’s foot is rotated, relative to its default position. The seam allowance is cut (negative value entered) or increased (positive value entered) accordingly.

Next distance adjustment² – by changing the default value, the next seam allowance is cut (negative value entered) or increased (positive value entered) accordingly, along its direction.

Notch parameters:

Prev. along seam – by checking this parameter, a corner notch is created on the next cut line, at the intersection of the previous seam line and the next cut line.

Next along seam – by checking this parameter, a corner notch is created on the previous cut line, at the intersection of the next seam line and the previous cut line.

  • Previous perpendicular with corner adjustment

Corner adjustments:

Distance adjustment¹ – by changing the default value, the perpendicular to the previous cut line is moved, relative to its default position, along the previous seam line’s direction. By moving the perpendicular’s position, the perpendicular segment length remains constant and the next seam allowance shape is adjusted accordingly, by altering the next cut line’s position. In this way, the seam allowance area can be cut (negative distance adjustment value) or increased (positive distance adjustment value) accordingly.

Prev. angle adjustment² – by changing the default value, the perpendicular’s foot is rotated, relative to its default position. The seam allowance is cut (negative value entered) or increased (positive value entered) accordingly.

Prev. distance adjustment³ – by changing the default value, the previous seam allowance is cut (negative value entered) or increased (positive value entered) accordingly, along its direction.

Notch parameters:

Prev. along seam – by checking this parameter, a corner notch is created on the next cut line, at the intersection of the previous seam line and the next cut line.

Next along seam – by checking this parameter, a corner notch is created on the previous cut line, at the intersection of the next seam line and the previous cut line.

  • Next perpendicular with adjustment corner

Corner adjustments:

Distance adjustment¹ – by changing the default value, the perpendicular of the corner geometry is moved, relative to its default position, along the next seam line’s direction. By moving the perpendicular’s position, the perpendicular segment length remains constant and the previous seam allowance is adjusted accordingly, by altering the previous cut line position. In this way, the seam allowance area can be cut (negative value entered) or increased (positive value entered) accordingly.

Next angle adjustment² – by changing the default value, the perpendicular’s foot is rotated, relative to its default position. The seam allowance is cut (negative value entered) or increased (positive value entered) accordingly.

Next distance adjustment³ – by changing the default value, the next seam allowance is cut (negative value entered) or increased (positive value entered) accordingly, along its direction.

Notch parameters:

Prev. along seam – by checking this parameter, a corner notch is created on the next cut line, at the intersection of the previous seam line andthe next cut line.

Next along seam – by checking this parameter, a corner notch is created on the previous cut line, at the intersection of the next seam line and the previous cut line.

  • Previous perpendicular with distance corner

Corner adjustments:

Distance adjustment¹ – by changing the default value, the perpendicular of the corner geometry is moved, relative to its default position, along the previous seam line’s direction. The next seam allowance shape remains parallel and the next cut line is cut by the perpendicular segment (positive value entered), or increased along its direction (negative value entered), creating the shape of this corner type.

Prev. angle adjustment² – by changing the default value, the perpendicular’s foot is rotated, relative to its default position. The seam allowance is cut (negative value entered) or increased (positive value entered) accordingly.

Prev. distance adjustment³ – by changing the default value, the previous seam allowance is cut (negative value entered) or increased (positive value entered) accordingly, along its direction.

Notch parameters:

Prev. along seam – by checking this parameter, a corner notch is created on the next cut line, at the intersection of the previous seam line and the next cut line.

Next along seam – by checking this parameter, a corner notch is created on the previous cut line, at the intersection of the next seam line and the previous cut line.

  • Next perpendicular with distance corner

Corner adjustments:

Distance adjustment¹ – by changing the default value, the perpendicular of the corner geometry is moved, relative to its default position, in the next seam line direction. The previous seam allowance shape remains constant and the previous cut line is cut by the perpendicular segment (negative value entered) or increased along its direction (positive value entered), creating the shape of this corner type.

Next angle adjustment² – by changing the default value, the perpendicular’s foot is rotated, relative to its default position. The seam allowance is cut (negative value entered) or increased (positive value entered) accordingly.

Next distance adjustment³ – by changing the default value, the next seam allowance is cut (negative value entered) or increased (positive value entered) accordingly, along its direction.

Notch parameters:

Prev. along seam – by checking this parameter, a corner notch is created on the next cut line, at the intersection of the previous seam line and the next cut line.

Next along seam – by checking this parameter, a corner notch is created on the previous cut line, at the intersection of the next seam line and the previous cut line.

  • New void corner

Corner adjustments:

Use same distance – if this option is checked, the value used for the Prev. distance adjustment¹ input OR for the Next distance adjustment² input is automatically used for both of them. If this option is unchecked, different values can be used in each of the inputs.

Prev. distance adjustment¹ – by changing the default value, the previous seam allowance is cut (negative value entered) or increased (positive value entered) accordingly, in the direction of the parallel to the next seam line.

Next distance adjustment² – by changing the default value, the next seam allowance is cut (negative value entered) or increased (positive value entered) accordingly, in the direction of the parallel to the previous seam line.

Notch parameters

Prev. along seam – by checking this parameter, a corner notch is created on the next cut line, at the intersection of the previous seam line and the next cut line.

Next along seam – by checking this parameter, a corner notch is created on the previous cut line, at the intersection of the next seam line and the previous cut line.

  • Bevel corner

Corner adjustments:

Use same distance – if this option is checked, the value used for the Prev. distance adjustment¹ input OR the Next distance adjustment² input is automatically used for both of them. If this option is unchecked, different values can be used in the each of the inputs.

Prev. distance adjustment¹ – by changing the default values, the previous seam allowance is cut (negative value entered) or increased (positive value entered) accordingly.

Next distance adjustment² – by changing the default value, the next seam allowance is cut (negative value entered) or increased (positive value entered) accordingly.

Notch parameters

Prev. along seam – by checking this parameter, a corner notch is created on the next cut line, at the intersection of the previous seam line and the next cut line.

Next along seam – by checking this parameter, a corner notch is created on the previous cut line, at the intersection of the next seam line and the previous cut line.

  • Previous bevel corner

Corner adjustments:

Distance adjustment¹ – by changing the default value, the cutting segment of this corner’s shape (the segment that joins the previous cut line with the next one) is moved on the bisectrix of this corner, cutting or adding the seam allowance shape, relative to the selected point.

Notch parameters

Prev. along seam – by checking this parameter, a corner notch is created on the next cut line, at the intersection of the previous seam line and  the next cut line.

Next along seam – by checking this parameter, a corner notch is created on the previous cut line, at the intersection of the next seam line and the previous cut line.

  • Next bevel corner

Corner adjustments:

Distance adjustment¹ – changing the default value, the cutting segment of this corner’s shape (the segment that joins the previous cut line with the next one) is moved on the bisectrix of this corner, cutting or adding the seam allowance shape, relative to the selected point.

Notch parameters

Prev. along seam – by checking this parameter, a corner notch is created on the next cut line, at the intersection of the previous seam line and the next cut line.

Next along seam – by checking this parameter, a corner notch is created on the previous cut line, at the intersection of the next seam line and the previous cut line.

  • Joined corner

Notch parameters

Prev. along seam – by checking this parameter, a corner notch is created on the next cut line, at the intersection of the previous seam line and the next cut line.

Next along seam – by checking this parameter, a corner notch is created on the previous cut line, at the intersection of the next seam line and the previous cut line.

  • Round trim corner

Corner adjustments:

Radius adjustment¹ – the radius of the circle that is used to round the corner.

Notch parameters

Prev. along seam – by checking this parameter, a corner notch is created on the next cut line, at the intersection of the previous seam line and the next cut line.

Next along seam – by checking this parameter, a corner notch is created on the previous cut line, at the intersection of the next seam line and the previous cut line.

  • Trim corner

Notch parameters

Prev. along seam¹ – by checking this parameter, a corner notch is created on the next cut line, at the intersection of the previous seam line and the next cut line.

Next along seam² – by checking this parameter, a corner notch is created on the previous cut line, at the intersection of the next seam line and the previous cut line.

Fold 2 – by checking this parameter, a corner notch is created on the cut line, at the Fold 2 intersection. The parameter is enabled only if the previous or next seam allowance of the selected corner have the Fold 2 option set.

Fold 3 – by checking this parameter, a corner notch is created on the cut line at the Fold 3 intersection. The parameter is enabled only if the previous or next seam allowance of the selected corner have the Fold 3 option set.

You Tube

مشاهده ویدئو در یوتیوب

telegram

مشاهده ویدئو در تلگرام

instagram

مشاهده ویدئو در اینستاگرام

شروع به کار

بسته برنزی

آموزش تصویری نرم افزار جمینی نسخه فشن استادیو
تومان
335000
3 ماهه
  • شامل 79 ویدئو از فصل اول تا سوم
  • پشتیبانی از طریق چت آنلاین
  • بدون کتاب
پیشرفت

بسته نقره‌ای

آموزش تصویری نرم افزار جمینی نسخه فشن استادیو
تومان
695000
6 ماهه
  • شامل 153 ویدئو فصل اول تا ششم
  • پشتیبانی از طریق چت آنلاین
  • بدون کتاب
حرفه‌ای

بسته طلایی

آموزش تصویری نرم افزار جمینی نسخه فشن استادیو
تومان
1235000
12ماهه
  • شامل 212 ویدئو کتاب
  • پشتیبانی از طریق چت آنلاین
  • بدون کتاب
خرید کتاب

کتاب

کتاب نرم‌افزار الگوسازی جمینی نسخه فشن استادیو
تومان
850000
  • قطع رحلی 302 صفحه رنگی با کیفیت عالی
  • پشتیبانی از طریق چت آنلاین
  • بدون بسته آموزش تصویری
فیلدهای نمایش داده شده را انتخاب کنید. دیگران مخفی خواهند شد. برای تنظیم مجدد سفارش ، بکشید و رها کنید.
  • عکس
  • شناسه محصول
  • امتیاز
  • قیمت
  • در انبار
  • موجودی
  • افزودن به سبد خرید
  • توضیحات
  • محتوا
  • عرض
  • اندازه
  • تنظیمات بیشتر
  • ویژگی ها
  • ویژگی های سفارشی
  • زمینه های دلخواه
برای پنهان کردن نوار مقایسه ، بیرون را کلیک کنید
مقایسه
لیست علاقه مندی ها 0
توجه: شما مجاز به کپی محتوا یا مشاهده سورس نیستید!!