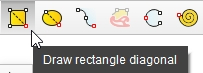
The Draw rectangle diagonal function allows you to create a rectangle, with a 90-degree constraint.
There are several ways in which you can draw a rectangle.
A. Create a rectangle without setting specific dimensions (no constraints on width and height)
Place the mouse cursor in the working area and make the left mouse click to begin drawing the rectangle.
Release the mouse button and go with the cursor in the position in which you want to be created the rectangle
Press on the left mouse button to be created the shape of the rectangle and then press ENTER to finish drawing it or press again the left mouse button.
B. Create a rectangle with specific dimensions (constraints on width and heigh)
Place the mouse cursor in the working area and make the left mouse click to begin drawing the rectangle.
Release the mouse button and place the cursor in the position in which you want to be created the rectangle
Do left mouse click to be created the shape of the rectangle
Go in the edits Width and Height from the below window. Insert the value for width and press ENTER, insert the value for height, and press ENTER.
Click in the working area to finish drawing the rectangle.
C. Create a rectangle with a constraint on width:
Place the mouse cursor in the working area and make the left mouse click to begin drawing the rectangle.
Go in the function steps panel, edit the Width value, and press ENTER. Once the ENTER is pressed the constraint is applied, and the lock option is set meaning that the width of the rectangle on screen, will be fixed at the value that you edited.
Place the mouse cursor on the working area and you will see that rectangle can be resized freely on the height just by mouse movement.
Do left mouse click in the working area once you arrived at the desired height
Press ENTER or left mouse button to create the rectangle
D. Create a rectangle with constraint for heigh:
Place the mouse cursor in the working area and make the left mouse click to begin drawing the rectangle.
Go in the function steps panel, edit the Height value, and press ENTER. Once the ENTER is pressed the constraint is applied, and the lock option is set meaning that the height of the rectangle on-screen, will be fixed at the value that you edited.
Place the mouse cursor on the working area and you will see that rectangle can be resized freely on the width just by mouse movement.
Do left mouse click in the working area once you arrived at the desired width
Press ENTER or left mouse button to create the rectangle
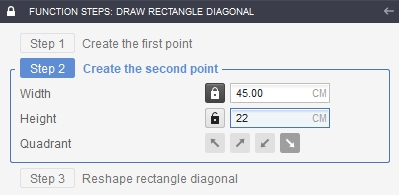
This is a three-step function:
Step 1: Create the first point;
Step 2: Create the second point;
Step 3: Reshape the rectangle diagonal.
Draw rectangle diagonal: Step 1: One click inside the working area will determine the first point of the rectangle. The four angles of the rectangle side are constrained to 90 degrees. Step 2: Rectangle side parameters can be now edited in order to obtain the needed shape:
No constraint for Width / Height: a free rectangle will be available on the working area. Any movement of the mouse will determine the recalculation of the values for Width / Height;
Constraint for Width and no constraint for Height: the needed value will be typed in the Width input. Once the Enter key is pressed, the constraint is applied, and the lock option is set. In the working area, the rectangle Width is constrained to the required value, while the rectangle Height is free and can be managed by the mouse movement.
Constraint for Height and no constraint for Width: the needed value will be typed in the Height input. Once the Enter key is pressed, the constraint is applied, and the lock option is set. In the working area, the rectangle Height is constrained to the required value, while the rectangle Width is free and can be managed by the mouse movement.
Constraint for Width and Height: the required values will be typed in the Width and Height inputs. Once the Enter key is pressed, the constraint is applied, and the lock option is set. In the working area will be displayed the rectangle together with the four possible quadrants where it can be placed. The selection of the suitable quadrant is done by mouse click.
Step 3: Rectangle diagonal parameters set in the previous step can now be modified. In order to finish drawing the rectangle side, press the Enter key or click on the Validate button.